Yes, we installed NavisWorks on a new workstation.
On this PC we installed the LMTools and used the Network License Activy Utility to receive our new network license. That all works fine.
So NavisWorks runs nice on that PC (actually 64 bits, Windows XP!). Because it runs the service and NavisWorks. Anyhow, now the other pc's have to connect to this new server.
Finally we found it. Still at the workstation with the LMTools running, the Microsoft Windows Firewall had been turned on. When turning this off, everyone can use the NavisWorks licenses again!
Now, I have to find out what ports have to be set for the firewall.
Drivers Download
Showing posts with label NavisWorks. Show all posts
Showing posts with label NavisWorks. Show all posts
This is not in the NavisWorks tutorial, but very handy.
- Start MS Excel and open:
C:\Program Files\Autodesk\NavisWorks Manage 2009\Examples\gatehouse\gatehouse.xls - Insert a Row on the top of the file and add column names (eg Layer, Date and Remark)
- Save the Excel file
- Start NavisWorks and open: gatehouse.nwd
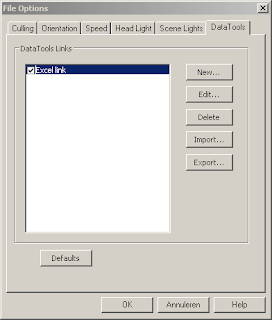
- Activate DataTools via Tools\File Options
- Select the Tab DataTools
- Press on New to create a new DataTool set
- Type a Name eg: Excel link
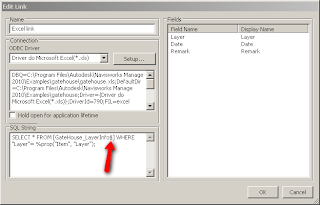
- Choose for ODBC driver: Driver Microsoft Excel (*.xls)
- Press the Setup button and select the Worksheet
- In the SQL String type:
SELECT * FROM [GateHouse_LayerInfo$] WHERE "Layer"= %prop("Item", "Layer"); - Whatch out! The $-sign is very important here!
- Double click in the Fields section and Enter the Field names according to the Column names you entered in Excel earlier
- Press OK
- The new Excel link is activated
- Press OK again
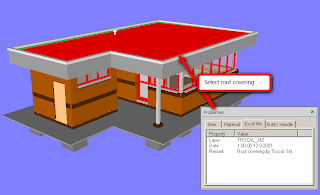
- Now, select an object and show the property in NavisWorks
- An extra tab "Excel link" is shown with the linked data to it.

I did not test it, but it seems very interesting.
Look at this Autodesk site. There you can download a Civil 3D Object Enabler. This should help you see Object information in other applications different from Civil like NavisWorks, AutoCAD, ....
Great! I will test it
Look at this Autodesk site. There you can download a Civil 3D Object Enabler. This should help you see Object information in other applications different from Civil like NavisWorks, AutoCAD, ....
Great! I will test it
From 17 to 21 November 2008 a BIMcaseweek is organised in the Netherlands. It is all about BIM and using different kind of applications (like Revit, NavisWorks), by different parties in one large project (buildings and infrastructure are integrated in this BIMcaseweek).
Unfortunately, the whole site is in Dutch. But keep looking to this site, it will be updated frequently in that week!
Unfortunately, the whole site is in Dutch. But keep looking to this site, it will be updated frequently in that week!
I ran into this problem several times. The strange thing is when you link Revit files and use Shared coordinates it all seems to work fine. Even, exporting to AutoCAD gives you the right coordinates if you set the Export options to Shared properly!
However, when exporting to NavisWorks using the NWC exporter the coordinates are handled in a strange way....
How is this possible? I figured this out...
First of all, let's start with a good Shared Coordinate Revit file (see another post of me, click here). So, in this way I am sure that it is a coorect file.
Next to this imagine the following: besides the Shared Coordinate Origin there is also a Revit Origin. And most of the times the latter give the problems!
================START==============================
To test the whole thing, I created an AutoCAD drawing with an AutoCAD block set on the WCS origin and a block put on the project location.
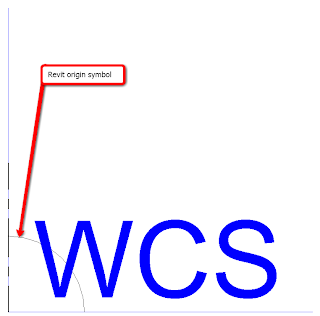 I exported this using the NavisWorks exporter to a NWC file. Opened it in NavisWorks and also append the AutoCAD DWG file. They match in NavisWorks. I mean, the WCS from the AutoCAD DWG and the Revit origin from the RVT-project are on the same location. Great!
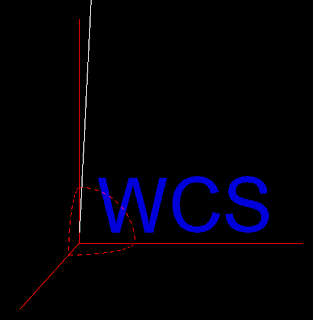
But now, I will use the method (Shared Coordinates) as descibed in a previous post.
So in Revit, the AutoCAD Project location is placed on top of the Revit origin by moving it. After that by using acquire, the right coordinates are used in Revit.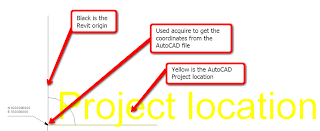 After exporting this to NavisWorks the Revit origin appears on the WCS of the DWG and not on the project location!
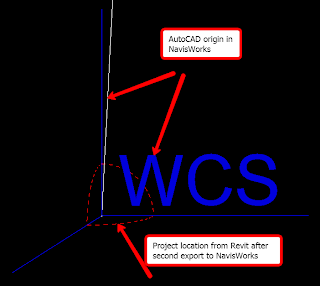
So, there it is. When exporting to NavisWorks the export uses the Revit internal origin instead of the Shared coordinates. So, keep that in mind when you are using Revit together with other CAD-applications
However, when exporting to NavisWorks using the NWC exporter the coordinates are handled in a strange way....
How is this possible? I figured this out...
First of all, let's start with a good Shared Coordinate Revit file (see another post of me, click here). So, in this way I am sure that it is a coorect file.
Next to this imagine the following: besides the Shared Coordinate Origin there is also a Revit Origin. And most of the times the latter give the problems!
================START==============================
To test the whole thing, I created an AutoCAD drawing with an AutoCAD block set on the WCS origin and a block put on the project location.

Next I created a Revit project with an Origin family.
By using an imported AutoCAD DWG (origin-to-origin) that has on the WCS an AutoCAD Block located, I am sure about the origin location in Revit.
 I exported this using the NavisWorks exporter to a NWC file. Opened it in NavisWorks and also append the AutoCAD DWG file. They match in NavisWorks. I mean, the WCS from the AutoCAD DWG and the Revit origin from the RVT-project are on the same location. Great!
But now, I will use the method (Shared Coordinates) as descibed in a previous post.
So in Revit, the AutoCAD Project location is placed on top of the Revit origin by moving it. After that by using acquire, the right coordinates are used in Revit.
 After exporting this to NavisWorks the Revit origin appears on the WCS of the DWG and not on the project location!
So, there it is. When exporting to NavisWorks the export uses the Revit internal origin instead of the Shared coordinates. So, keep that in mind when you are using Revit together with other CAD-applications
Subscribe to:
Comments (Atom)


