Showing posts with label AutoCAD 2011. Show all posts

What's New in AutoCAD 2011-Part 1


Click to enlarge
The new start up screen in AutoCAD 2011. Make sure to go through the New features Workshop to see what's new.

AutoCAD 2011, the 25th release of Autodesk’s world famous design program AutoCAD, has been released. It has many updates, new features, and new tools added to it. Some of the more flashy additions are the new surface modeling tools as well as the new point cloud abilities. But perhaps the greatest additions are the new design tools that are intended to help your design process and workflow.


Changes to the Interface
Don’t be afraid, AutoCAD doesn’t have a new interface again, only a few tweaks. Rest assured that the default background color has changed again. It is now a dark gray. If you want to change it, open the OPTIONS window, go to the Display tab, and click on the Colors button. Pick the option, and then pick the color you want it to be. Since AutoCAD is often used for design drafting purposes, Autodesk decided to change the visual display of the grid to an actual grid instead of the series of dots we have all known and loved for so many years. I have to say that I “never” use the grid; but, now that it looks like graph paper, I will give it a try. Drawing on graphing paper has always been fun, maybe this new feature will make drawing in AutoCAD even more fun than it ever was before!


The grid feature in AutoCAD is now displayed as lines in a graph instead of a series of dots.


The Quick Access Toolbar has had a face lift. It now displays the name of the current workspace. The workspace selection field has been move from the status bar and placed in the QAT. Click the selection arrow to change your workspace. Out of the box, the QAT now contains the Save As tool.

Navigation has a new tool. Yes another! This new tool is called the Navigation Bar. It replaces the navigation tools that were previously on the Status Bar. It can be moved around to either the left or right side of the screen, or to either the top or bottom of your screen. You can even turn it off you want to. The Navigation Bar has the Steering Wheel on it, the View Cube, Show Motion, Pan, Zoom and Orbit. If you are using a 3D Connexion Device (a 3D Mouse) then the Navigation Bar has integrated support for it, when AutoCAD sees the appropriate hardware driver. On top of that, the View Cube can now be used with the 2D Wireframe visual style. If you like the View Cube in 3D, try it out in 2D.

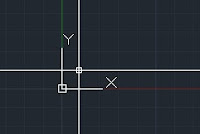
The UCS Icon was changed to show a different color for each axis. Red is for the X axis. Green is for the Y axis. Blue is for the Z axis. The cones at the end of each axis line have been removed.

The Ribbon
The Ribbon has had some minor tweaks and twists added to it; nothing major, just some cosmetic surgery so to say. A new pull down menu option has been added to the Minimize Ribbon arrow button. Before 2011, when you clicked the Ribbon Minimize Arrow, the Ribbon would cycle through all of the possible minimize options one at a time. Now you can set that as the default setting, or you can tell which one of the options (minimize to Tabs, Panel titles, Panel Buttons, or all) you want the Ribbon to Minimize too. This is handy because you can toggle through the full Ribbon, to just the titles, or whichever setting you prefer. If you minimize the Ribbon to Panel Buttons, large icons are shown for each panel. You can expand them by hovering over them, just like when the Ribbon is minimized to Panel titles.

The View Tab of the Ribbon has a new Windows Panel. It is similar to the Windows Pull Down Menu form the Menubar of old. This panel has options to choose between open files, tiling of open files, toolbar display options and user interface options. The toolbar display options works just like right clicking on an open toolbar. It lists the available toolbars in your workspace. Here you can toggle specific toolbars on or off.
A new Fold Panels feature has been added to the Ribbon. When you change the size of the AutoCAD window, add or remove Ribbon Panels, the Fold Panels feature comes into play. Fold Panels resize themselves horizontally to fill the available space. When you make a panel a Fold Panel, you can define default, minimum and maximum button sizes.

Visual Styles
AutoCAD has had five visual styles available for us to use: 2D Wireframe, 3D Wireframe, 3D Hidden, Conceptual, and Realistic. AutoCAD 2011 has added five more visual styles. They are: Shaded, Shaded with Edges, Shades of Gray, Sketchy, and X-ray.
AutoCAD 2011 has added five new Visual Styles, each one having a different look


Visually Isolating Objects
AutoCAD 2011 has given us new visual display control tools. These new tools allow us to control the visibility of objects outside of the layer controls. We can now isolate objects based on selection and not just on layer values. These new tools are accessed through the right-click menu. When you use the Isolate Objects tool, only the selected objects will be seen. All other objects are hidden. Right click again to make everything visible again. The second visibility tool is the Hide Objects tool. This tool hides the selected objects, keeping everything else visible. This is useful when you need to work in a busy area of your model. You can use both visual tools at the same time, meaning that you can hide certain objects first, then isolate a few of the remaining objects. Once you have finished working, right-click and pick the End Object isolation tool. Isolated or hidden objects will remain in that state if you end your drawing session. The status bar has an icon that looks like a light bulb. If it is yellow, no objects are isolated or hidden. If it is red, then objects are either isolated, hidden, or both. You can also click the light bulb to start either tool.

Conclusion
AutoCAD 2011 has added many new and useful tools. We have only begun going through them. There are even more 2D tools that we haven’t touched yet and there are tremendously powerful new 3D modeling tools now available to us in AutoCAD. Stay tuned.

(Reprinted with permission from Autodesk User Group International - AUGI)

Deadlines, what would we do without them?

Deadlines pile up, more frequently than not.  But that's a good thing.  Without deadlines I might not ever get anything finished.  I have tons of projects that I have started, but few that I have finished.  The projects that have deadlines get finished.  It's a funny thing, motivation. Deadlines are nothing more than a form of motivation.  And getting paid is another popular motivator!

Right now my biggest project is my next AutoCAD training video.  The first one I made is called "AutoCAD Fundamentals".  There are two versions, one for AutoCAD 2010 and another for AutoCAD 2011.  The training video I'm working on now is called "Advanced AutoCAD Techniques", but honestly, that title may change, but the content is the same.

AutoCAD Fundamentals is meant to teach a new user how to use AutoCAD from scratch!  It will even work for AutoCAD LT.  Advanced AutoCAD Techniques will go well beyond the basics.  It will delve into advanced operations, referencing files, data extraction, customizing AutoCAD, animations, 3D Modeling, adn much more.

I don't have a release date for it yet, but stay tuned.

In the meantime, I'm putting together the very early stages of my next project.  This next project revolve around training and the web.  I don't have a date yet, but I am very excited about this.

If you are new to AutoCAD go to my CAD-a-Blog Store page and follow the links to my training DVDs.  If you need further training on AutoCAD and want to become an advanced user, my next video will suite you wonderfully.  It will be here soon enough.

What's New in AutoCAD 2011 - In Detail - Part 1

AutoCAD 2011 is out and it has been given several updates.  It seems that recent new AutoCAD releases have had, generally speaking, two major new features added to it.  AutoCAD 2010 had mesh modeling and parametric constraints added to it.  AutoCAD 2009 had the Ribbon and the Action Recorder, though, the Action Recorder has a lot of potential, many users consider it a bust (I don’t, I think it’s great).  Perhaps the same goes for the ribbon as well.  Face it, CAD users don’t like change.  Every release with a major change has had more than its fair share of gripes and groans.

AutoCAD 2011 has two major updates, surface modeling, and a culmination of document tools.  There really isn’t one major new documentation feature (except maybe the transparency setting that is now available,) but instead there are several additions and tweaks that separately are weak, but together make AutoCAD 2011 the best AutoCAD yet!


This is the first article in a series that will closely look at the new features.  I don’t want to give a list of what’s new, but instead, I want to go in-depth and show you each new enhancement.  Some of the articles will cover one new item while others will look at several.  Some new features may even span more than one article.  If you haven’t installed your copy of AutoCAD 2011 yet, do so now.  As a CAD user of over 17 years, this latest release really has me smiling.  Yes I’m an AutoCAD fanboy, but just wait.  Even if you aren’t into the heavy features of AutoCAD (then shame on you for not using the tools you have paid for) you are still going to love the “little things” that are in AutoCAD 2011.

AutoCAD 2011 background & grid are different

Let’s get started.  One of the very first things you may notice in AutoCAD 2011 is the background color.  Yet again Autodesk has seen it fit to change the color, though this time it is more subtle.  It is now a dark gray.  I don’t know why they insist on changing it almost every release, but they do.  It’s ok really, because it is easy enough to change to whatever color you want.  I have a post (click here) that describes the process.  The post is for AutoCAD 2009, but the process is the same for AutoCAD 2011.

Another thing you are going to notice is that there is an actual grid when you turn the grid display feature on!  Out of the box it is on.  Also notice the UCS Icon, it too looks different.  No more cones at the ends, just lines, one for the X Axis and one for the Y Axis.  The grid is colored green on the Y Axis and red on the X Axis.  This is nice because it helps them to stand out, I guess.  This makes the background look more like old fashioned graph paper.  Funny how over the years there have been more and more items in AutoCAD to make its drawings look more “hand drawn” than before.

And since we are on the UCS Icon, the 3D Gizmos have been tweaked a bit too.  Each one is a bit more distinct so that it is easier to tell them apart.  They are also more consistent with their functions.  The axis colors match the UCS icon, and each gizmo looks much more different from the others.  They are still easy to use, go to the Ribbon (in the 3D Modeling Workspace), Home Tab, Subobject Panel.  Expand it, and go to the Gizmo Command.  Select which Gizmo you want to use, now select a 3D object.  The gizmo you picked should pop up.  If not, select the object first, then pick the Gizmo.  Keep the object selected, now pick a different Gizmo, it changes.  If you need to switch between Gizmos, it’s easy.  Just pick the one you want.
The 3D Gizmos


One more highly visible change is in the navigation tools.  By default, there is now a Navigation Bar tool.  This bar has some of the most frequently used navigation tools in it.  It has:  Steering Wheel, View Cube, ShowMotion, Pan, Zoom, and Orbit.  These items used to be in the status bar; they aren’t anymore.  You can turn the navigation bar off and on if it gets in your way.  You can dock the Navigation Bar on the top, bottom, left or right side of the drawing window.  You can also control what navigation tools are displayed.  To change the nav bar, click on the arrow at the bottom of the navigation bar.  This brings up the settings dialog box.  You can also control which version of each command is visible.  Pick which Zoom Command you want to use, though all are available.  The same goes with the orbit command as well as the other tools.  The ViewCube has been enhanced to support the 2D Wireframe view style.  This allows you to rotate your viewport on a two dimensional plane.  One last thing, if you are using a 3D Connexion device, controls for it will show up in the Navigation Bar.


The new Navigation Bar
That’s it for now.  We will get into the other new features and enhancements in later posts.  What have you used so far?  What do you like or dislike about AutoCAD 2011?

Happy Cadding